Pages

6.30.2011

Kale Tacos


Despite the cloudy weather predictions, last night was a beautifully sunny evening.  So I hopped in my car after work and headed down to the Columbia City Farmer's Market.  This was my first time there this season, and it was full of smiles and fresh produce.  I arrived in the last hour, so I was quickly walking around on a mission with my tote bag and wallet in hand.  My usual plan is to do a full lap, scanning all the goods, while taking mental notes.  Then I go back to the starting line to make my purchases.

While on lap number one, I spotted dozens of varieties of greens.  So this sparked my dinner plans.  Kale tacos!  Using kale leaves as taco shells makes for a nice light dinner.  And the best part is that you can fill them with whatever sorts of fillings you want.  I was drawn to another green, dotted with little yellow flowers, which turned out to be rapini.  I asked the farmer how to prepare it, and she suggested sauteing it and adding to pasta with cheese.  Check.  Will be doing that very soon.  I also got some 'Easter Egg' radishes...which live up to their name.  And to finish off the trip with style, I bought a $5 bouquet of the most fragrant flowers.


One suggestion I want to make when you make kale tacos, or any other recipe, is to make it fun.  Set all the fixings for the tacos in bowls and make an assembly station that shows off all of your creative work, even if you are eating alone.  I cooked some black-eyed peas from dried last week, in my new found skill set.  So I pulled them out of the freezer along with a little bit of frozen corn.  I really thought I had half of an onion in my refrigerator, so was visably disappointed when there were none in there.  For replacement, I decided to use a lot of garlic.  And as I reached for the bulb, realized I had three mini shallots!  So I could have (sort of ) an onion.  I recently fixed a shredded carrot salad, which was so refreshing.  So I shredded a few and tossed them with lime juice and red pepper flakes for the vegetable portion of the taco.


Also the great part about using greens as a taco shell is that you can use any variety of green.  Collard greens would be a sturdy wrapping especially if you are using meat or hefty fillings.  Chard or any other variety of kale would work too.  Or if you wanted mini tacos, use spinach.  Whatever you choose will make for a lively dining experience and will leave you feeling pleasantly full.


Kale Tacos
Yields about 2 servings

Tacos are a festive summer dinner items...and why not make them more colorful and a lighter?  This type of recipe is an empty canvas.  You can use the traditional fixings like ground beef, lettuce, cheese and salsa.  Or any other of vegetable and protein combination.   Let your imagination run wild.

1 Tbsp olive oil
3 small shallots, minced
2 cloves garlic, minced
1/2 tsp ground cumin
Salt and pepper to taste
1 cup black-eyed peas, precooked (either homemade or canned)
1/4 cup corn, fresh or frozen
2 carrots, shredded
1/2 lime, juiced
Red pepper flakes
1 bunch kale, any variety

Heat a medium saute pan over low to medium heat.  Add the olive oil.  Drop in the shallots and saute for about 5 minutes, ensuring they don't burn.  If they start to brown to early, turn the heat down.  Add the garlic, cumin, and a sprinkling of salt and pepper.  Saute for about 1 minute.

Take the shallots and onion out of the pan and pour into a small bowl for later.  Add the black-eyed peas and corn into the same pan.  Saute for a few minutes.  Add the shallots and garlic back in and stir well.  Turn off heat.

Shred the carrots and toss with lime juice and red pepper flakes.  Soak the kale leaves in a bowl of cold water.  Rinse each leaf off and dry well.  Cut off any tough stem parts.
Assemble the tacos with the black-eyed pea mixture, shredded carrots, parsley and a spritz of lime juice.  Eat immediately alongside a nice cold lager.

6.24.2011

Simple Whole Wheat Pearl Couscous


My new favorite grain is whole wheat pearl couscous.  When I went to the BlogHer food conference about a month ago, we got tons of samples from Bob's Red Mill.  And this couscous was one of those such samples.  The hearty fiber-richness is my favorite part of this grain...alongside the filling taste and cute little pencil eraser-like shape.  So I took a handful of packets and have been experimenting with it ever since. 

So this week, I had some leftover fresh parsley from last week's two bean salad and half of a leftover onion.  As the couscous was cooking the other day, I was trying to figure out how to season it.  A nice sweet onion flavor mixed with the freshness of the parsley.  A little depth from some butter...and I had myself a meal.  I crunched into a cucumber salad on the side...and there I was with a refreshing lunch, with plenty of leftovers for dinner or better yet, lunch tomorrow.  Maybe a fried egg will appear next time.


Simple Whole Wheat Pearl Couscous
Yields 3-4 cups

Pearl couscous is the whole version of the instant variety that we are all more used to seeing.  It takes a little longer to cook, but well worth the wait to bite into the soft little pellets.  You can season couscous any way you like because it will take on whatever flavor you add, much like pasta.  So try your hand at different herbs, spices and vegetables.

2 1/2 cups water
1 cup whole wheat pearl couscous, dry
1 Tbsp olive oil
1/2 onion, thinly sliced
1 cup fresh parsley, chopped
1 Tbsp butter
Salt and pepper to taste

Bring a medium pot of water to a boil.  Add in the couscous and bring to a low simmer.  Cover and cook for about 15 minutes.

Meanwhile, heat a medium saute pan on low and add the olive oil.  Allow the oil to warm up for a few minutes.  Slide the onions into the pan.  Saute on low for the entire time the couscous is cooking.  This should produce translucent, perfectly cooked onions.  Add salt and pepper to the onions to your taste preference.

Taste test the couscous to check doneness.  If it is done, strain out any extra water in the pot if there is any.  Flip the butter and onions into the couscous pot.  Stir very thoroughly until the butter is totally melted.  Add in the parsley until fully combined.  Salt and pepper the mixture to your taste preference.  Serve alongside a crunchy cucumber salad or grilled chicken.


6.20.2011

Two Bean Salad


It is slightly embarrassing to admit this, especially after all the cooking classes I took for school...but until this post, I had never cooked beans from dried at my house.  And now I am completely sold.  I feel as though I have been let in on a really big secret.  A few weeks ago I was shopping in the bulk section and as I eyed all the dried goods, made myself grab a bag and portion out some dried garbanzo beans.  No time like the present to try something new, right?

So they sat on my counter staring me down for a good two weeks.  I would walk by them, using my peripheral vision, saying 'I know! I will!'.  So finally, the night before I knew I would be working from home, I clinked the little beans into a glass bowl, covered them in water, put a plate over them and quickly slid them into the refrigerator.  Ok.  Step one was taken.

I always thought a gigantic amount of time had to be allotted for cooking dried beans.  So knowing I would be home all day on the computer, with the stove visible over the screen, I felt safe.  And safe I was.  And quite proud actually...because it was a real success.  It is not nearly as cumbersome of a task as I imagined.  So below I have included a little instruction for those of you in the same camp I was about dried beans.  Really, it isn't scary.  You will be so proud of yourself.


Decide how many beans you want to have on hand.  I started with about 2 cups of dried beans.  Pour into a medium sized bowl and cover with ample water.  This is the re-hydrating process, so give them plenty of water to drink.  Cover with a plate or plastic wrap and refrigerate overnight, or at least 5 hours.

The next day, rinse the beans through a strainer and fresh cold water.  Pour them into a heavy bottomed pot or Dutch oven and pour several cups of water over.  I added a few dried bay leaves for a little extra flavor.  Bring to a simmer and leave them alone for 45 minutes.  Agitating them with a lot of stirring can pull them apart and make them messy.  Do a taste test of one bean after this time.  Continue simmering in 10 minute increments until done.  I cooked mine for about 1 hour 10 minutes.  Drain and let cool.  From here you can package some up and freeze for another time.  You can use the rest however you like, such as in a two bean salad.


Two Bean Salad
Yields 3-4 cups salad

R had some recipe testing to do last Friday, so she had me over for dinner with the instruction to bring a salad.  Low and behold I had freshly cooked garbanzos to share, so that was the starting ingredient.  If you are pressed for time, by all means use canned beans. This recipe pretty much materialized in my mind as I rode the bus home.  The only issue I found with it was that the honey I used was a vanilla tasting one, so it gave the salad an 'interesting' flavor.  But if you use regular, mild honey or swap it out with maple syrup, all will be well. 


2 cup fresh green beans, blanched and cut into 1" slices
1 red pepper, cut into small cubes
1 cup garbanzo beans, home cooked or from canned
1 cup fresh parsley, minced

Juice of 1 lemon
1 tsp melted honey
1/4 tsp salt
1/4 tsp pepper
2 garlic cloves, minced
1/2 tsp Dijon mustard
2 Tbsp red wine vinegar
Dash of red pepper flakes
2 Tbsp olive oil

Bring a pot of water to a boil.  While you are waiting for that, fill a large bowl with ice water...this will be the bath for the green beans after blanching, to stop the cooking process.  When the water begins to boil, add the green beans.  Cook for just a minute or two so the beans turn a bright green color.  Using tongs, fish out the beans and immediately plunge them into the ice water.  Let them bathe for a few minutes.  Pull them out of the water, dry with a towel and cut into 1" pieces.

Meanwhile prepare the dressing.  Whisk together all ingredients (lemon juice through red pepper flakes) except the olive oil.  Slowly pour in the oil at the end, while continuously whisking.  Taste and adjust flavors to your liking.

In a medium bowl, combine the red pepper, garbanzos, chopped green beans, and parsley.  Toss together with the dressing.  Adjust seasoning as you see fit.  Serve alongside an entree such as grilled chicken like R made or as a lunch salad.


6.15.2011

Roasted Eggplant with Macadamia Pesto


Last week I cleared my fridge and kitchen counter because I was embarking to the other tip of the country: Montauk.  My first exposure to the region was the movie 'Eternal Sunshine of the Spotless Mind'.  I always think of Jim Carrey's character skipping work on that cold snowy day to take the train to Montauk.  And how pretty the beach was even in the dead of winter.  My best friend A got married last weekend, so we all packed our suitcases from all over the country, and trekked our way to a beautiful wedding weekend.


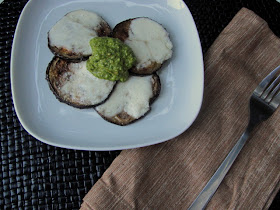
So back to the kitchen counter.  The dinner created in these pictures was one of those that materialized on my fingertips as I grabbed for this, and scrounged for that.  I had an eggplant, a mostly full box of basil, a lemon, a half full container of fresh mozzarella, and handful of cherry tomatoes and macadamia nuts in the freezer.  Every ingredient except for the frozen nuts would likely be at least halfway to garbage status by the time I got back, so pesto atop roasted eggplant was the logical solution.
So I popped the oven on 425 degrees and started roasting the tomatoes.  It wasn't a ton of tomatoes, but enough to blend into the pesto to add an extra fruity flavor.  The macadamia nuts have been in the freezer door ever since the dark chocolate bark I made last month.  I had recently bought a container of finely sliced Parmesan, that was going into my freezer, but wanted a chance at the pesto.  I got a little extra hop in my step as a new ingredient idea lit as a light bulb above my head.  So let this be a challenge to you to whip up a new dish with ingredients you have on hand.


Roasted Eggplant with Macadamia Pesto
Yields about 1 cup pesto and 2-3 servings of eggplant

This was a very personalized recipe in attempt to use perishable ingredients that could be transformed into something that could be frozen.  Use any cheese or nut from your fridge to add a different dimension.  Any sort of vegetable would be good roasted and then topped with the pesto and a little bit of cheese.  So go wild with your ingredients.


1 eggplant, medium-thinly sliced and sprinkled with salt
Olive oil
Fresh mozzarella

1/2 cup tomatoes (Roma or cherry are best, but any will do)
2 1/2 cups loosely packed fresh basil
Juice of 1 lemon
2 cloves garlic, roughly chopped
1/4 cup olive oil
1/4 cup Parmesan cheese
1/8 cup macadamia nuts
Salt and pepper to taste

Preheat oven to 425 degrees. 

Take the sliced eggplant and place on a baking sheet lined with parchment or Silpat.  Sprinkle with salt.  Set aside for 30 minutes to let the salt work it's magic.

Slice the tomatoes in half.  Toss with a little bit of olive oil, salt and pepper.  Place cut side up on a baking sheet also lined with parchment or Silpat.  Roast in the oven for about 30 minutes until the tomatoes shrink a bit, and the edges start to dry.  If you are using Roma tomatoes, you may need to roast a little longer. 

After the eggplant slices have been resting for 30 minutes, take a paper towel and wipe the sweat and salt.  Flip the slices over and repeat the sprinkle of salt and let sit for another 30 minutes.

Meanwhile, after you take the tomatoes out of the oven, bump up the heat to 450 degrees.

Allow the tomatoes to cool while you put all the pesto ingredients (basil, lemon juice, garlic, olive oil, Parmesan, macadamia nuts, salt and pepper) into a food processor.  Once the tomatoes are cooled, add them in as well.  Blend until smooth.  Occasionally scrape sides to get every little bit into the pesto.

When the second side of the eggplants have rested for 30 minutes, wipe again with paper towel.  Now coat each of the eggplant slices with a little bit of olive oil.  Roast until browned, about 10-15 minutes.  Take the sheet out, flip the eggplant and coat with olive oil.  Roast this side for about 10 minutes.  Remove from oven, top with fresh mozzarella slices.  Broil for a few minutes until browned.

Serve eggplant with a dollop of pesto for a nice appetizer or accompanied by a salad for an entree.


6.08.2011

Basil Asparagus and Fresh Mozzarella Galette


I am part of a group of girls that call ourselves the Food Group.  A few of us met through volunteering with Cooking Matters and have expanded with other food minded friends.  The theme of our group is a shared  interest in and/or a career in a food related field.  We have a nutritionist/trainer, a personal chef, a cheese and charcuterie expert and animal loving farming blogger...and me.  Needless to say, the food offerings at these gatherings are always eye-popping, conversation stoppers.


I was flipping through my Cooking Light magazine a few days before the party, and came across this galette recipe.  I had never made a galette before, but is sounded very similar to the deep dish Chicago style pizza my family would always get when visiting the Windy City.  The buttery dense crust stuck in my mind since the last time we visited.

This crust consists of flour, cornmeal, butter and salt.  Considering this recipe is from Cooking Light, I imagine other recipes use a lot more butter.  But it was plenty rich for the Food Group.  The original recipe has tomatoes and feta toppings.  I was in a more earthy mood, so mushrooms and asparagus were the main feature.  Roasted garlic was the flavor enhancer.


Pictured above is the sandy consistency you are aiming for, for the dough right before you pour in the ice water. 


The instructions below make this recipe look long and complicated, but it really is quite easy.  You can choose whatever toppings suit your fancy, and you certainly don't have to roast garlic and saute a bunch of veggies.  You can do as the original recipe says and use lots of tomatoes and basil.  I did add some basil leaves to the galette immediately after taking it out of the oven, which added a nice freshness.

Also, I put the cheese on a bit too early, so it got a little more burnt than I wished...as you can see in the picture above.  So I changed the instructions below to account for that error.  Otherwise, it was a great complement to our white bean dip, kale salad, asparagus with balsamic reduction and rhubarb pudding cake...and of course wine. 

Basil Asparagus and Fresh Mozzarella Galette
Inspired by Cooking Light June 2011
Makes about 8 servings

1 1/2 cup all purpose flour
1/2 cup yellow cornmeal
7 Tbsp unsalted butter, chilled and diced into small cubes
1 1/2 tsp salt, divided
6 Tbsp water, from a glass of ice water

Topping options:

1 bulb garlic
     -Olive oil, salt and pepper
1 1/2 cup crimini and shiitake mushrooms
     -1 Shallot, diced
     -Thyme and pepper
Asparagus, sliced in half
     -Olive oil and dried basil
Artichoke hearts, defrosted from frozen or canned and drained
     -Oregano

Fresh mozzarella
Parmesan cheese
Fresh basil, minced

Prepare the dough first because it has to rest for a half hour.  Measure out the flour, making sure to level it off with a knife, in the measuring cup before turning the flour into the bowl of a food processor.  On top of the flour, add the cornmeal, butter and 1 tsp of the salt.  Process these ingredients until it is a sandy texture.  Keep the processor on, take the lid off the food chute and slowly add 6 Tbsp of water from a glass of ice water.  Only process until it mixes, just before forming a ball.

Preheat oven to 425.

Press the dough into a 6 inch flattened circle.  Wrap in plastic wrap and refrigerate for 30 minutes.  While this is resting, roast the garlic if you are using it as a topping.  Cut cross-sectionally across the top of the garlic bulb, so you can see a little bit of the tips of each clove.  Either place on top of a piece of foil, or in an oven safe container that has a lid.  Drizzle some olive oil over the bulb and sprinkle with salt and pepper.  If using foil, wrap into a neat little package.  Place in oven and roast for about 40 minutes.

Meanwhile, prepare the other toppings.  Heat a small saute pan on medium heat and add olive oil.  Add shallots and saute for a few minutes.  Add in the mushrooms, thyme and pepper.  Saute until they are a few moments from being cooked.  They will cook again on the galette.

Toss the raw asparagus in olive oil and dried basil.  Set aside. Saute  the artichoke hearts in olive oil and dried oregano, until just cooked.

When dough is adequately rested, remove the plastic wrap.  On a cutting board coated in corn meal, spread dough out into a large circle.  Transplant it onto a pizza stone or baking sheet lined with parchment.

After you have removed the garlic from the oven, keep the oven at 425.  This will be the galette's temperature as well. 

Arrange the mushrooms, roasted garlic, artichoke hearts and asparagus onto the dough, making sure to leave 1-2 inches of 'crust' because you will fold this over.  Drizzle a little olive oil if you want a little more.  Sprinkle with the rest of the salt and pepper to your taste.  Fold the outer edges over about an inch, to form a thicker crust so that it covers a little bit of the toppings.

Put in oven for about 25 minutes, without the cheese.  You do this so the crust cooked adequately.  Check on it about halfway through if you want to be sure it is cooking thoroughly.  Add cheese after 25 minutes.  Cook until the cheese browns to your liking.  Take out of oven and sprinkle with the fresh basil.

Cut into 8 pieces and serve alongside a nice kale salad and sauteed asparagus.


6.05.2011

Coconut Pumpkin Doughnuts


I am honored to announce that I've been included in a food blogger recipe swap group from all around the country.  This month we are assigned a recipe from Christianna's vintage cookbook.  From there, we are to swap out ingredients and make it our own creation.  If you click on the link to her website,  http://www.burwellgeneralstore.com/ you can see all the other lovely food blogger's recipes.  This month, 'Potato Donuts' is the recipe.

I was thinking to swap out the potato with some kind of colorful, starchy vegetable.  Then I remembered a little container in my freezer with homemade pumpkin puree I made after the holiday season.  I have been looking for excuses to use anything coconut lately, so coconut milk and coconut flakes found their way into the recipe as well.


The original recipe suggests letting the dough sit for three hours in the fridge before frying.  I made the dough yesterday, and then had a Farm to Table dinner to attend last night (which by the way was awesome).  So I didn't get reacquainted with the dough until this morning, a good 17 hours later.  The dough was nice and rested, and fried up just fine.


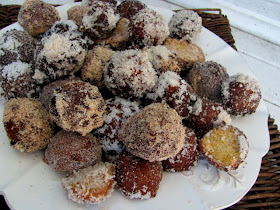
I started off making them about the size of a large gumball, but found that the center wasn't cooking all the way through.  Making them a little smaller helped.  So this recipe made about 3 dozen.  I was also a little nervous about using really hot oil.  I realized that I have never fried in a Dutch oven by myself outside of a cooking class.  I was sweating nervously as the heat crept up to 300.  So I just kept it there because a test piece of dough cooked up just fine.
 

The three coatings I chose were cinnamon sugar, ground almonds with cinnamon and ground coconut.  Cinnamon and sugar definitely attached itself to the outside of the doughnut the best.  So if you coat it with that first, and then roll in coconut or almonds, it will cover nicely.


In an attempt to make these donuts healthier, I baked a few.  First I rolled the dough in oil, and then placed on parchment paper on the baking sheet and subsequently baked them at 375 for about 15 minutes.  They turned out more to be like little scones and flattened on the bottom.  They taste pretty similar to the inside of the fried ones, but the outside texture is much different.  So all in all, I stick with the rule of thumb that if you are making doughnuts, just make them as they should be: fried.

Coconut Pumpkin Doughnuts
Adapted from Bon Appetit October 2004 on Epicurious.com
Yields 2-4 dozen, depending on the size of the doughnut hole

The pumpkin coconut taste is very subtle in these doughnuts...just enough that they taste different than a regular doughnut.  You can easily swap in regular milk if you don't have coconut milk.   And also canned pumpkin instead of homemade puree.  Either way, these are a pretty fun diversion from a regular doughnut, and a crowd pleaser amongst friends.


1 3/4 cup all purpose flour
2 tsp baking powder
1/2 tsp salt
1/2 tsp cinnamon
1/4 tsp ground ginger
1/4 tsp baking soda
2 Tbsp ground coconut flakes, unsweetened
1/8 tsp ground nutmeg
1/16 tsp ground cloves

1/2 cup sugar
1 1/2 Tbsp butter, unsalted and room temperature
1/2 whole egg
1 egg yolk
1/2 tsp pure vanilla extract
1/4 cup coconut milk
1/2 cup pumpkin puree (homemade or canned)

1/4 cup ground coconut, unsweetened
1/4 cup ground almonds with 1/4 tsp ground cinnamon
6 Tbsp sugar with 1/2 tsp cinnamon

In a medium bowl, combine the first 9 ingredients.  Using a fork or whisk, stir to combine evenly.  In a separate large bowl, using an electric hand mixer on low, combine the sugar and butter until it is the texture of course sand.  Whisk in the 1/2 of egg.  Incorporate evenly.  Pour in the egg yolk and vanilla.  Whisk.  Slowly pour in the coconut milk and combine evenly.  In four installments, add the pumpkin until smooth.  Fold the dry ingredients with a rubber spatula, also divided into four sessions.  Cover with plastic wrap and chill for at least 3 hours (and up to 18 hours).

Prepare your toppings/coatings right before taking the dough out of the refrigerator.  I did ground coconut, ground almonds with cinnamon, and sugar and cinnamon.  Choose whatever you like.  Cover a large plate with several layers of paper towels for draining the cooked doughnuts.

Roll the dough into little doughnut holes, about the size of a large gumball, or a little smaller.  This should make two dozen.  Place on a piece of parchment paper for the preparation.  Pour the canola oil into a Dutch oven or deep fryer.  Attach a candy thermometer to it if you have one.  Heat oil to about 300 degrees.  You can take a small piece of dough and drop into the oil to see if it cooks to test the temperature.  With a slotted spoon, carefully drop three or four doughnut holes into the oil at a time.  Turn them occasionally to cook evenly...this should take about two minutes.  Remove with a slotted spoon and transfer to the plate with paper towels.  Allow the doughnuts to cool completely.

Roll them in your toppings of choice and eat immediately!


6.01.2011

Basic Hummus with Homemade Tahini

Last weekend M invited me over to discuss our lives over hamburgers and salad.  She is pregnant and in the midst of transforming the extra bedroom into a nursery for baby G, the most current name for her stomach's inhabitant.  Saturday was a surprisingly warm and summer-like day, so everyone in Seattle was pulling off the grill covers.  I started thinking of sipping white wine on front porches. 


I decided to contribute a dish that we could snack on while the burgers were grilling.  I rarely make homemade hummus because there are so many good brands out there.  But I realized I had all the fixings.  As I pulled the garbanzo beans from the cabinet, memories of the Colorado Deja Vu coffeeshop flooded my brain.  I felt like the Tasmania Devil...whipping myself into a cyclone, and landing inside the coffeeshop.  I could feel the old wooden ceiling fan pushing air on my neck and the sound of coffee beans pouring into the glass container.  The regulars were hunched over breakfast burritos oozing with green chili.  The dessert case jammed with peanut butter pie and rhubarb crisp.

J and I loved making the hummus at Deja Vu.  We would wait until the owner left for the day before making it, so we could double the recipe.  Being the responsible managers that we were, we needed to taste test our creation on handfuls of tortilla chips.


Although after making the Deja Vu recipe countless times, I don't exactly remember the proportions.  But this is a pretty close rendition.  So by all means double or triple this recipe as needed, because you will inevitably find all kinds of food items to slather the hummus and leftover tahini on.

Basic Hummus with Homemade Tahini
Makes about 2 cups

This is the most basic of basic hummus.  It is a canvas for your wildest dreams for garbanzo bean spread.  Add whatever else you like, such as olives or roasted red peppers.  By all means use premade tahini if you have it and want to save a step.  I just happened to have a huge bag of sesame seeds and no tahini, so I just whipped up a batch.  As a little aside...tahini is really good on a piece of toast with cucumber slices.


1/2 cup sesame seeds
Olive or safflower oil (if needed)
Salt to taste

1 can garbanzo beans, drained and rinsed
2 cloves garlic, roughly chopped
2 lemons, juiced
1 Tbsp tahini
3 Tbsp olive oil
Salt and pepper to taste

Heat a medium saute pan over medium heat.  Pour in the sesame seeds.  Continually flip them around until they begin to brown.  This will take between 5 and 10 minutes.  Once they become aromatic and lightly browned, turn off heat and allow them to cool.

Drizzle the cooled sesame seeds into a small food processor.  Blend.  It will take several minutes before a paste begins to form.  Add a little salt to taste.  If  it is on the dry side, slowly pour a little bit of oil through the liquid dispenser while the processor is still on.  Blend until smooth. 

In a medium to large food processor, combine the garbanzo beans, garlic, lemon juice, 1 Tbsp of tahini, olive oil, salt and pepper.  Blend until smooth.  Scrap the sides with a rubber spatula and blend some more.  Taste.  Add more oil, garlic or tahini to your taste preference.  Serve with crackers or pita bread, veggies and feta.  Assemble into little tasty bites.