Pages

An Open Cookbook

An Open Cookbook

12.21.2011

Zucchini Parmesan


I know we are all so very busy at this time of year, so I will keep my conversation brief.  My first order of business is to suggest having a bowl of olives and a glass of wine at your fingertips while you prepare this recipe (or any recipe for that matter).  The picture above represents my evening snack, basically from when I step into the door.   You see, I walk to and from work, so by the time I get home, I am pretty hungry.  While I don't want to spoil my appetite for dinner, olives seem to do the trick.


This zucchini Parmesan dish does have several steps, but it is a great dinner party dish and can even made the day or night before.  It reheats quite nicely, and like lasagna, tastes even better the next day since all the flavors have had a chance to marry.  You can certainly do this same recipe with eggplant or other varieties of squash may be interesting.  But take the recipe for a spin.  You will impress the people warming the kitchen chairs.


Zucchini Parmesan
Yields 2-4 servings

This recipe is a little looser than most of my recipes, mostly because I don't follow a recipe for eggplant or zucchini Parmesan.  This is a simplified combination recipe of eggplant/zucchini Parmesan and lasagna mixed together to make for a healthy, lighter version.  If you want a little more, serve spaghetti noodles to accompany.

2 zucchinis, sliced thinly with a mandolin or carefully with a sharp knife
Flour
Spices, such as oregano and thyme
1 egg, whisked
Olive oil
Tomato Sauce (click for recipe or use from the jar)
Parmesan, shredded

If you are making your own sauce, start there first so that it can be simmering on the back burner while you prepare the zucchini.  Preheat oven to 400 degrees at this time as well.

Prepare the zucchini by slicing in long thin slices from the top to the bottom as pictured above.  Set aside.  Prepare two very shallow bowls or two deep plates with the dredging stations.  In one plate or bowl, pour in the whisked egg.  In the other plate or bowl, pour in enough flour that you imagine will finely coat each zucchini slice (you can be conservative here because you can always add more).  Toss in some herbs.  I used oregano and thyme.  Prepare one or two large saute pans at this time as well, because once you coat the zucchini, you can start sauteing.  Heat the pans on low to medium and pour in a healthy amount of olive oil.

Take one zucchini slice at a time and flip it around in the the egg.  Then carefully take out of the egg bath and let drip dry a little.  Then lay it carefully in the flour mixture and coat both sides with flour and spices.  You can immediately put this into the saute pan.  Repeat with all of the slices and put in saute pan(s).  Cook each side for a few minutes until it browns.  Flip over and cook the other side.

Next is the assembly.  Prepare an oven safe casserole dish by rubbing a little oil around the bottom and sides.  Treat this segment like lasagna assembly.  Pour a thin layer of tomato sauce into the bottom of the pan.  Make a layer with the zucchini slices next.  Sprinkle with Parmesan cheese.  Repeat the process by pouring tomato sauce on top of this.  Then add zucchini and cheese.  Repeat until zucchini is completely used.  Top with the last of the sauce and a sprinkling of cheese.

Bake for 15 minutes or until the sauce is bubbling and the cheese has melted and browned to your liking.  Remove from oven and let sit for about 10 minutes to let the ingredients get cozy with each other.  Slice in and serve as a light dinner or add pasta or chicken on the side for a heartier dish.


12.14.2011

Simple Roasted Vegetables


Forewarning...this post is a little unconventional in the ingredient measurement department.  Probably like many of you, I have stepped onto the holiday roller coaster with the rare, yet cherished nights of staying in, cooking dinner, having a glass of wine and maybe watching an episode of Mad Men Season 2.   Tonight is one of those nights.  Although I only have thanks and gratitude for all the wonderful events and get togethers that have populated my appointment book...many-a-happy hours, food, holiday parties galore, food events, dinner outings, several dancing opportunities, gift exchanges, food, champagne, charity events, and did I mention food?

I was doing dishes yesterday, and realized I hadn't been home to cook dinner for at least a week...hence, the time lag since last post.  So tonight I am embracing the ability to make one of my favorite dinners...roasted vegetables with a medium cooked egg and a glass of wine.  I mean, you can't get much better than this.  So by unconventional, I mean that I didn't do exact measuring for the mere pleasure of shaking the spice containers over the oil coated vegetables.  So I ask you to do the same...enjoy your evening, throw together this simple dinner and put your feet up...the party is right in your living room.


Simple Roasted Vegetables
Yields 3-4 cups


You are absolutely at liberty...in fact I urge you...to use whatever vegetables you like. Broccoli, Brussels sprouts, potatoes, carrots or any of the ones I used roast quite nicely.  Use any of your favorites herbs as well, such as thyme, parsley, basil or rosemary.  The following recipe is my tried and true: lots of garlic powder, salt and pepper.  I think I am always trying to bring a little Black Bottle broccoli flavoring into my kitchen.

7 crimini mushrooms, quartered
1 eggplant, cut into 1/4th inch circles and then cut those in half moon shapes
1 head cauliflower, cut into chunks
3 Tbsp olive oil, divided
A heavy-handed sprinkling of garlic powder (about 1 tsp, divided)
Salt and pepper to taste

Preheat oven to 440 degrees.  Cut the vegetables and place onto a Silpat or parchment lined baking sheet.   Drizzle 2 Tbsp olive oil all over the vegetables.  Give them a very generous (about 1/2 tsp) coating of garlic powder.  Sprinkle in salt and pepper.  Using your hands, toss and coat all pieces involved.  Roast for 15 minutes.

Once 15 minutes are up, remove sheet from oven.  Toss the vegetables with a pair of tongs.  Drizzle the remaining Tbsp of olive oil, another 1/2 tsp garlic powder and more salt and pepper.  Toss evenly.  Return to oven for 15 more minutes.

This is a good time to do your dishes, check email, prepare tomorrow's coffee, sip a glass of wine or eat some olives.  When the buzzer goes off, open oven, toss one more time with the tongs.  Return to oven for 10 more minutes.  Repeat above activities as needed.

When the final timer goes off, they should be fully ready for consumption.  Serve alongside your favorite protein, or top with a medium cooked egg like I did.  Divine dining.


12.07.2011

Butternut Squash with Shallots (Roasted vs. Pressure Cooked)


I was a lucky girl last month for many reasons.  First of all, when we had M's going-away-to-vacation dinner party, her sister C made the best squash dish I think I have ever had.  It was roasted butternut squash cooked with shallots and topped with a light parsley dressing...AND I got a plastic container full of leftovers.  So during the Thanksgiving season, the squash revisited our table.
I was also lucky, because I got to borrow a Fissler pressure cooker from Allrecipes last month too.  And so I set out to compare the time saving abilities of a pressure cooker.  My main experiment was on the squash.  Roasting does lend itself to a nice rich product, but it does take upwards of an hour.  So I wanted to see how much time a pressure cooker would save on this particular dish.  Being the novice pressure cooker that I was, I hadn't ever thought about how the pressure that builds inside a cooker has to be generated from liquid.  And after reading the instructions for the cooker, I learned there had to be at least 2 cups of liquid in the cooker for it to work.

So this was going to change the consistency of the dish.  I wanted to keep it really flavorful, and I had just happened to have opened a bottle of white wine around the same time, so I figured, why not go wild and pour some into the cooker.  I also had a fresh container of chicken broth, which would also add a nice herbal dimension.

And the outcome?!  I liked them both for very different reasons.  The roasted squash dish had a much richer depth to it from the almost caramelized effect of roasting.  The pressure cooker version was lighter, especially with the lemon juice addition and the fruitiness of the wine.  They both made for really good leftovers...again.

Roasted Butternut Squash with Shallots
from C at M's going away party

1 butternut squash, peeled, de-seeded and sliced in 1/4th inch cross-sectional cuts
3 shallots, peeled and chopped in half
1-2 Tbsp olive oil
Salt and Pepper

1 Tbsp cider vinegar
2-3 Tbsp fresh parsley, chopped
1 Tbsp Dijon mustard
2 Tbsp olive oil

Preheat oven to 375 degrees.  In a large oven proof dish or a parchment lined baking sheet, toss the squash and shallots with 1-2 Tbsp olive oil until every piece is generously coated.  Sprinkle with salt and pepper.  Roast for 45-60 minutes until the squash is very tender.

Meanwhile you can make the dressing by whisking the vinegar, parsley and mustard.  Slowly pour in the olive oil last, while continuously whisking.

Remove the squash and shallots from oven, transfer to a serving dish.  Toss with the dressing.  Adjust any salt and pepper needs.  Serve alongside your favorite main dish or bring to a dinner party.  Your guests will be elbowing for seconds.


Pressure Cooked Butternut Squash and Shallots with Wine
Adapted from C's original recipe

1 butternut squash, peeled, de-seeded and sliced in 1/4th inch cross-sectional cuts
3 shallots, peeled and chopped in half
1-2 Tbsp olive oil
Salt and Pepper
1/2 cup dry white wine
1 1/2 cups chicken broth

1 medium lemon, zested and juiced
3 Tbsp fresh parsley, chopped
Salt and pepper

At the beginning, treat the pot part of your pressure cooker like any other pot.  Drop in the squash pieces, shallots, olive oil and salt and pepper.  Over medium heat, saute them for about 5 minutes until lightly cooked.  Pour in the wine and chicken broth.  Put the lid on top of your pressure cooker, close and lock it.  Turn the heat up and allow the pressure to build.  Every pressure cooker is different, but the particular Fissler version that I was borrowing has a blue circular device that rises.  When two white rings appear, the pressure has built.  So do the same version with your pressure cooker.  Once the pressure is built, turn the heat down as low as possible.  Cook for about 8 minutes.  Turn off heat, slowly release the pressure ( a lot of steam will emit, enough for a mini facial if it isn't hot).  Unlock the lid, and remove the goods.  With a slotted spoon, remove the cooked squash and shallots.  Toss with lemon zest, juice and parsley.  Season with salt and pepper.  Serve as a side dish or like I did, alongside an over-medium cooked egg.  Use the leftover liquid for your favorite soup recipe.

12.04.2011

Chocolate Chip Peanut Butter Bar


It is Recipe Swap time of the month again!  Last month we celebrated a year's worth of recipes from one cookbook, so Christianna has decided to switch gears and give us recipes from a new cookbook called 'The Second Ford Treasury of Favorite Recipes from Famous Eating Places'.  And this month's recipe is the Toll House chocolate chip cookie.  And to be totally embarrassingly honest, I had never thought about Toll House cookies originating from a toll house converted into an inn.  Toll House was always a proper name to me...it never dawned on me that it was an actual toll house:


There are so many reasons why this is the perfect recipe for December.  First of all, it is cookie making time of year, so this is a great way to incorporate our Recipe Swap group recipe with a food item that can be shared with the special people in our lives.  Another reason is that my friends at Allrecipes.com are participating in Cookies Across America which is a national campaign that Allrecipes and Nestle Toll House are launching where groups host cookie exchanges to bake and donate cookies to shelters, food pantries, schools, etc. in order to share the holiday spirit with the community.  You can click on the highlighted word above, and see the Facebook page for more details if you are interested in participating with your friends.  So it is synchronicity that both the Recipe Swap group and Allrecipes would go hand and hand with the Toll House cookie this month.  


I was really scanning my brain's Rolodex of recipes and consulted with my mom (the family baker) on my walk to work the other day and came up with a cookie bar topped with my favorite three ingredients: peanut butter, chocolate and coconut.  What a better way to enjoy a cookie, than to be smothered in a melted peanut butter cup type topping.  These flavors warm my cheeks and make me rub my hands together in excitement.  I don't know if it is because I ate a lot of peanut butter for dinner as a kid, or frequently slurped down peanut butter cup blizzards after soccer practice or still dip my chocolate bar in the peanut butter jar after dinner...but this is my idea of a perfect dessert.  I also added some oats into the bar portion to make it even more of a comfort food.  So after whipping these babies up and making my kitchen warmly scented with chocolate, I sliced them into small squares, sampled the coconut and 'plain' ones, and promptly wrapped and froze them so I can take them to the Allrecipes.com Cookies Across America event next week.  So if you are looking for an easy, rich dessert for your cookie making this year, try these or take a look at the other Recipe Swappers' take on the recipe below.  I can't wait to see what everyone else did with the original cookie recipe.   


Chocolate Chip Peanut Butter Bar
Yields 16 servings
Adapted from The Second Ford Treasury of Favorite Recipes from Famous Eating Places


This recipe gives you the freedom to add or omit a sprinkling of coconut on top of the chocolate.  I opted to leave half of the pan 'plain' and half sprinkled with coconut.  I sampled both, and maybe like the coconut one 55% more.  The chocolate portion ended up being as thick as the cookie portion, so you could flip them over and call them 'oatmeal-chip-chocolate-chip-cookie-coated chocolate bar'.  I think it depends on your mood, whether on not to add the coconut...either way, you will bring a smile to anyone who bites into these little squares of heaven.


1/4 cup butter, room temperature
3 Tbsp brown sugar
3 Tbsp sugar
1/2 egg, beaten
1/4 tsp baking soda
1/4 tsp hot water
1/3 cup all purpose flour
1/3 cup oats
1/4 tsp salt
1/2 tsp vanilla extract
1/3 cup chocolate chips (bittersweet or semisweet)

1 1/2 cup chocolate chips (bittersweet or semisweet)
1/2 cup peanut butter
1/3 cup shredded coconut (optional)

Preheat oven to 375 degrees.  In a large bowl, combine the butter and the two sugars.  Beat them together until smooth and airy.  Add in the egg.  Combine the baking soda and hot water in a small bowl.  Add this into the sugar mixture.  Slowly pour in the flour, oats and salt.  Stir in the 1/3 cup chocolate chips and vanilla until every ingredient is fully combined in the batter.  Spoon the batter into a parchment lined (or buttered) 9x9 pan.  Spread into an even layer.  Bake 12-15 minutes, until cookie bar is fully cooked.  Remove from oven and let cool.

While the cookie is cooling (keep it in the pan for chocolate pouring purposes), in a double boiler (or in microwave), combine the remaining 1 1/2 cup chocolate chips and peanut butter.  Heat until the they fully melt, stirring occasionally.  Once the chocolate and peanut butter is fully melted, pour on top of the cookie bar, allowing it to drip down the sides of the cookie bar in the pan.  Sprinkle with coconut if you so choose.  Place the pan in the freezer for about 10 minutes.  Once it has solidified, move it to the refrigerator until the bars have a solid layer of chocolate on top.  Remove and cut into small squares.  Serve as a dessert with coffee, milk or dessert cocktails.


11.28.2011

Almond Goat Cheese Grapes


Now that the holiday season is officially here, it is quite helpful to have a few quick appetizers in the repertoire for dinner parties and last minute post shopping get togethers.  I came upon this one in the Seattle Times a few weeks ago, and experimented at an ATM get together.  Half the plate was gone before I even put it down on the table.  One of T's neighbors ran home to get her appetizer, but when she got back, there was only one grape left.  Lucky for us, she was toting a giant hot triangle of brie dripping with warm honey and walnuts.  And this was just the beginning of the night.

The original recipe calls for raw almonds and then walks you through oiling, flavoring and roasting them...which was my original plan.  But M and I were short on time on our way over, and as we ran into the grocery store, I spied a can of hickory smoked almonds.  This would cut out a whole slew of minutes AND they were already flavored.  It was a win win.  There are so many differently flavored nuts out there, so your options really are endless.  I think crushed cashews would add a nice rich flavor to this recipe.  Also, if you or yours doesn't care for goat cheese, you could easily swap in cream cheese.  OR if you are looking for more of a dessert, swap in homemade whipped cream.  The options are as endless as the bulbs in that pile of Christmas lights on your floor.  So really let your holiday hair down and spice up the kitchen table.


Almond Goat Cheese Grapes
Adapted from The Seattle Times

This may sound a little bit of a strange blend of ingredients, but rest assured they will disappear within minutes.  The original recipe calls for grapes, but we had a whole bowl of strawberries on the table, so I dressed those up too, and actually ended up liking them better.  So try any variety of fruit wrapped in goat cheese and almonds.

1/2 cup almonds, roasted and salted
1 large bunch of grapes
1 log of goat cheese

Begin by chopping the almonds into small pieces with a knife or hitting with a rolling pin.  Sprinkle them onto a plate.  Next, using your clean fingers, gently take a small scoop of the goat cheese and coat the grapes (or strawberries).  This is pretty messy and you will feel as though you are wrapping a balloon for paper mache with all the white clumps that form on your fingers.  But simply push through as if this is to be expected and perfectly normal.  Once coated, generously roll the goat cheese coated grape in the almonds.  Put on a plate and continue until all the fruit is used.

Refrigerate for at least 10 minutes so the cheese can harden a little.  It gets pretty warm from your hands.  Remove from refrigerator.  Eat one immediately because once the plate is on the table, your guests will be swarming the plate.


11.15.2011

Gingered Carrot and Apple Soup and Respect the Bird


I just recently learned of a campaign called Respect The Bird through my friends at Allrecipes.com.  It is a blog dedicated to the appreciation of Thanksgiving day and staying mindful of and fully celebrating it without getting distracted by all the craziness of Holiday shopping that seems to have snuck into the stores while everyone was out trick or treating.  It is a blog completely putting the turkey on a pedestal for us to remember Thanksgiving and all the wonderful parts of our lives we are thankful for.  So I am dedicating this posting to the Respect The Bird campaign by making a list of what I am thankful for....and also giving you a nice light soup recipe you can make this week before Tday.

Top 10 things I am thankful for:

1. Coming from a loving and supportive family and for all the love my family has given me.  My appreciation and thankfulness is beyond words.  You have given me the world.

2. My close friends near and far away.  I have learned so much from each and every one of you and appreciate you all so very much.

3. A very lovely apartment and roof over my head and a building full of friendly neighbors who all love our building so much...and for our house dinner parties.

4. The internet.  The ability to look at a friend's pictures from a yoga retreat in the Phillipines, while instant messaging with a friend in D.C. and a friend in New York simultaneously, while paying a bill all the while listening to a personalized radio station is pretty dang amazing.  I would still be writing in a recipe journal sitting on my bookshelf for only my eyes if the blogisphere didn't exist.

5. Coffee and wine.  Enough said.

6.  The luxury of having a great education starting with preschool all the way through graduate school and the ability to use all of the knowledge and opportunities to help myself and hopefully others.

7. My health and the ability to walk everywhere around town for exercise, go to yoga, and workout at the gym.

8. A good job where I get to learn so many different components of research, work with a nice group of people and use a full kitchen to cook my lunch everyday.

9. Airplanes and the ability to be across the country or world in a matter of hours.

10. The genius who gave us the idea of leggings and boots.

Now it is your turn to sit down and write your list...and show it off on your refrigerator at home.  You can even put a sticker on it to reward yourself.  In the meantime, try cooking this soup recipe I made up last week.  It is super simple and is a great lunch soup and freezes nicely too.


Gingered Carrot and Apple Soup
Yields 7-8 servings

In the spirit of eating cleanly last week and this week, I stocked the fridge and freezer with several containers of soup.  What a better way to eat your carrots and apples but in a pureed soup spiced heavily with ginger and curry powder? 

1 Tbsp olive oil
1/2 onion, chopped
3 medium apples, roughly sliced
1 tsp fresh ginger, grated
1 lb. bag carrots
2 tsp curry powder
1 lemon, juiced and zested
4 cups vegetable broth (homemade or store bought)
Salt and pepper

Heat a large pot or Dutch oven on medium heat.  Pour in the olive oil and allow to heat for a few minutes.  Drop in the onion and saute for about 5 minutes.  In goes the apple next.  Sprinkle some salt and pepper in at this point.  Stir and saute for another 5 minutes or so.  Your kitchen will begin to have a sweet onion-y aroma.  Add in the ginger and carrots next and saute for another 5 minutes.  Stir in the curry powder, coating all the onions, apples and carrots.  Add the lemon zest, juice and vegetable broth and cover.  Bring to a boil and reduce to a simmer for 20 minutes. 

Turn off heat and allow to cool slightly.  Working in batches, puree the soup in a blender or food processor.  Once it is all pureed, add back into the pot and turn on the heat for a few minutes if it has gotten cold.  Serve with a sprinkling of fresh parsley and alongside a nice fresh arugula salad.


11.14.2011

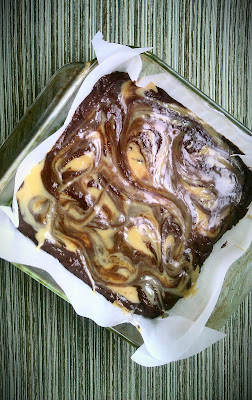
Spicy Caramel Brownies


I was one of the lucky food bloggers to participate in the Will Bake For Food event at the University Height building last weekend.  The concept is brilliant.  We all made a dessert and set up booths displaying our goods.  Then people exchanged non-perishable items for tickets to spend on the goodies.  Then all the food was donated to the Emergency Feeding Program.  It kind of felt like we were all participating in a live board game or carnival with money in the form of little red tickets.  And because it was an event full of food bloggers, every single item looked and tasted of professional grade.


This event was also in the midst of a food centric weekend for me. Friday night was karaoke paved with curried fries, Japanese Karaang Chicken, tequila and birthday cake.  Saturday was Will Bake for Food, followed by Mexican fiesta of tamales, beef tacos, margaritas, chips, mango and papaya salad and slivers off a Chihuahua-sized burrito.  That night, another birthday party at a Mexican restaurant...with roasted beet tacos, guacamole and black bean tostado, AND...no, not a tequila inspired beverage...but white wine.  Then the next day, homemade apple and oatmeal pancakes and French press coffee.  For lunch, sesame chicken with kale (you can see that post on the site I have been contributing to on FaveDiets by clicking on it), followed by happy hour snacks and wine.  Yes I have entered some sort of edible vortex.  So starting yesterday, I am eating all clean, color-rich vibrant food, such as my Curried Carrot Apple soup...in preparation for Thankgiving.


But let's focus on the matter at hand...spicy caramel brownies.  This was a new spin on the salted caramel concept.  Spicy chocolate smoothed out with homemade caramel.  You really can't go wrong with all these ingredients whipped together in a 9x9.  And you can even package them in little bags tied with hemp twine and arrive at your next lunch date with a treat.


Spicy Caramel Brownies
Yields 12 good sized brownies
from Cooking Light November 2011


It was a very uncharacteristic way for me to approach this recipe, but I followed it exactly how it said (except that I used 1/2 whole wheat flour).  And I certainly was pleased with the result.  As someone who has more of a savory tooth, it was shocking for me to find that they were a tad on the less sweet side.  So if you like super sweet brownies, bump up the sugar to 3/4 cup.  I also think some cinnamon would really round out the flavors.  But all in all, fabulous dessert.  The spicy red pepper adds a subtle heat.

1 can (14 oz) fat free sweetened condensed milk
1 ounce bittersweet chocolate, in big chunks
1/2 cup sugar
6 Tbsp butter, softened to room temperature
1/2 tsp pure vanilla extract
3 egg whites
1/2 cup all purpose flour
1/2 cup whole wheat flour
1/3 cup unsweetened cocoa powder
1/2 tsp baking powder
1/2 tsp ground red pepper (or ground red pepper flakes)
1/8 tsp salt
Parchment paper or cooking spray

Pull out your double boiler, or do a makeshift one like I did by getting out your largest saute pan.  Fill it with water and place a large metal mixing bowl into the water.  This will serve you just as well.  The whole reason for this is so the sweetened condensed milk warms and cooks but doesn't burn.  So bring the water to a soft boil.  From here, pour the sweetened condensed milk into the bowl of the double boiler.  Keep the water at a constant simmer.  Simmer the sweetened condensed milk for 1 1/2 hours, stirring fairly regularly.  Cook until it turns to a nice light brown caramel color.  After this happens turn off heat and allow to cool off a little bit.

While this is cooking, you can prep the other ingredients and start to assemble them when there are about 30 minutes left for the caramel.  At this point, preheat your oven to 350 degrees.

In a medium microwave safe bowl, microwave the bittersweet chocolate pieces for about 30 seconds.  Remove and stir until it is a velvety liquid.  Add in the sugar and butter and beat on low speed until all the ingredients are fully blended.  Add in the vanilla and egg whites and beat again until smooth. 

In a separate bowl, combine the flours, cocoa powder, baking powder, red pepper and salt.  Slowly pour the dry ingredients into the wet ingredients.  Stir in half of the sweetened condensed milk (now caramel).  Spoon the batter into a parchment lined 9x9 or sprayed with cooking spray.  Drop in small spoonfuls of the remaining sweetened condensed milk and swirl around with a knife to make a creative design.  Bake for 19-25 minutes, depending on your oven, until the center is fully cooked.  Cool (if you can wait) on a wire rack.  Goes really well with a hot cup of coffee.


11.08.2011

Italian Wedding Soup


Speaking of feeling extremely fortunate...I have two topics to discuss.  First off, I was very lucky to receive an invitation to the Taste of Tulalip Tweet Up last month, cataloging the menu for the upcoming Taste of Tulalip happening this weekend.  I have always heard praises about the food at Tulalip Casino, but haven't had the opportunity to indulge.  So it was a real treat to have a menu sampling all the goods.  It was so lovely to sit down at the table to be immediately hydrated with a glass of Cristal.  The next course was my favorite...I was confused because it looked as though they were serving us espresso, which seemed strange at the beginning of the night.  But to my pleasant surprise it was Italian Wedding soup.  I have never seen it served in such a creative way...each of the meatballs were skewered on a decorative toothpick.  And you could either spoon or drink the rest of the soup.  The next day I asked Allan for the recipe.  I had to make this for my next dinner party.  We finished the night off with coffee and pistachio nitrogen ice cream served in mini waffle cones, with a side of homemade malted milk balls.  I mean, can it get any better than that?  So if you have the opportunity to go to Taste of Tulalip next weekend...go!


The other order of business is to express how fortunate I am for having such good girlfriends in my life.  M, K, M and C came over to my house last Saturday night for a bon voyage party for M.  She is going on an extended vacation, so we needed to see her off in style...which naturally meant an extravagant dinner, free-flowing wine, lots of laughter and ending the night watching/dancing to YouTube videos.  The picture above was the dinner table right before the  festivities began.  You will have to use your imagination to envision the table four hours later.  It was a perfect occasion to make the Italian Wedding Soup which was accompanied by Arugula Steak Salad and a homemade olive and Parmesan appetizer.  The next course was salmon (for the fish eaters) and baked butternut squash with shallots and a parsley dressing.  Yes. It was an amazing meal.  Cheers to M, K, M and C...you know who you are.  Thank you for a lovely Saturday night.


Italian Wedding Soup
Yields 8-12 servings
Adapted from Taste of Tulalip's Tweet Up Menu


The original recipe calls for chicken stock and shredded chicken in the stock.  But there was a request from one of the guests to not include chicken in any of the recipes.  So I eliminated it and made my own vegetable stock.  And we completely didn't miss the chicken either, especially with the meatballs and the egg whites.  That brings me to another point.  Approach the egg white action at the end of the soup recipe with confidence and ease.  I thought it sounded a little strange, but alas, it is quite a nice addition to the recipe.

Meatballs
1 Tbsp olive oil
1 clove garlic, finely chopped
3 Tbsp onions, very finely chopped
1/2 tsp dried oregano
1/2 tsp dried basil
1/8 tsp dried thyme
1/4# lean ground beef (good quality grass fed)
1/4# ground pork (good quality local)
3 Tbsp Italian bread crumbs
3 Tbsp Parmesan cheese, grated
2 Tbsp fresh parsley, finely chopped
1 Tbsp olive oil
1 egg
1/4 tsp ground black pepper
1/4 tsp garlic powder
1/2 tsp salt
Olive oil for sauteing the meatballs

Pull the meats out of the refrigerator as you begin to prepare all the other ingredients.  Allow it to rest at room temperature for 30 minutes.

Meanwhile, heat a medium saute pan on medium heat.  Pour in 1 Tbsp olive oil and allow to warm up.  Add in the garlic and onions and saute for a few minutes.  Sprinkle in the oregano, basil and thyme and saute for another minute.  Turn off heat and allow to cool.

In a medium bowl,  combine the beef and pork with the remaining ingredients.  Add in the sauteed herbed onions and garlic.  Mixing with your hands is the most efficient (and fun) way to integrate all the ingredients.  Keep in mind to not over mix because it will make the meatballs tough.

Now for the rolling process.  First get yourself a little bowl of water with a splash of olive oil in it.  Dip your hands into it so that when you are working with the meat, you hands have a nice oiled surface.  Take a little bit of the meat and roll it into a gumball sized ball.  You can vary the size depending on how you will be presenting the soup.  But little meatballs are fun.  Make sure that there are no cracks in the meatball after you roll it so it doesn't fall apart when you cook it. 

Heat a large saute pan on medium heat.  Add in a thick layer of olive oil and heat to a medium heat.  Carefully place the meatballs into the pan and saute until they are fully cooked.  Be sure to flip them over so all the surfaces get cooked.  Also keep the heat on medium because you don't want super hot oil burning the meatballs.  Cut one in half to make sure it is fully cooked.  Line a plate with paper towels and place the cooked meatballs in it to drain a little.  Set aside.

The Soup
3 Tbsp olive oil
1/2 cup onions, chopped
1 clove garlic, minced
1 cup celery, chopped
1 cup carrots, chopped
2 Tbsp fresh basil, chopped
8 cups good quality or homemade vegetable (or chicken) broth
1/4 tsp red pepper flakes
1 cup fresh kale, roughly chopped
1 cup dry pasta (any variety you like...I used orecchiette)
Meatballs (from above recipe)
4 egg whites
Salt and pepper
3 Tbsp Parmesan Reggiano

In a Dutch Oven or large heavy bottomed pot, turn the heat up to medium and pour in the olive oil.  Saute the onions, garlic, celery, carrots and basil for about 5 minutes.  Add in the broth and simmer covered for 30 minutes.  During this time, follow the instructions on the label for your pasta of choice and cook al dente.  Strain and set aside.

Add the red pepper flakes, kale, cooked pasta and meatballs to the soup.  Carefully pour in the egg whites and let them simmer without stirring until you begin to see them cook...this takes 5-10 minutes.  After they have begun to cook, whisk to break them apart and fully integrate into the soup.  Adjust seasonings, add salt and pepper and Parmesan Reggiano.

Serve in little coffee cups with a few meatballs skewered for an appetizer size or in larger cups or bowls for a hearty meal alongside a salad.


11.06.2011

Chocolate Maple Zucchini Cake


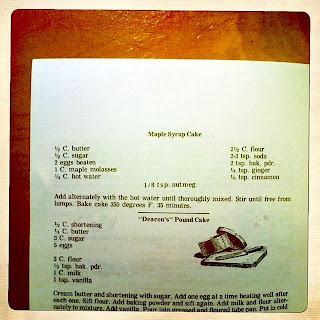
Pull out the party hats because today is a day to celebrate.  The monthly Recipe Swap group is celebrating it's 1 year birthday.  Just one year ago, Christianna of Burwell General Store created this special monthly swap including recipes from her vintage cookbook with a few fellow bloggers.  It was such a success that she started adding more people to the mix as the year progressed.  I was extremely fortunate to meet her at the BlogHer conference in May and feel so blessed to be included in such a great group.  So this month we are recreating a Maple Cake as a our birthday cake recipe:


I have always treated birthdays as a time to reflect on the past year and to make plans for the upcoming year.  And lucky for me, I just celebrated my actual birthday too.  So I have been doing a lot of thinking in the past few weeks.  The girls at work had a lovely party for my on my birthday.  R introduced me to the idea of chocolate zucchini cake.  I mean...brilliant concept...shredded zucchini, whole wheat flour and chocolate chips.  It is basically unhealthy not to eat it.  So it was synchronicity when our recipe swap's theme was birthday cake and maple influenced.  So I thought, why not combine R's chocolate cake and sweeten it with maple syrup.  It was one of those times in life where everything fell into place and made perfect sense.


Joining the recipe swap group has been a gigantic life enhancement.  First and foremost, meeting dozens of fellow food bloggers in person and online has added a comforting dimension to my life.  It is so nice to have a forum of creative people to bounce off ideas, compare notes and look up to.  It is especially great that we are sprinkled all over the world adding so many different perspectives to the group.  It is so interesting to see how we all spin off of the original recipe.  Many life lessons have been added to my repertoire.  We all get the same original recipe, and we each interpret it completely differently.  'Variety is the spice of life' has a whole new meaning now.  And everyone's story to go along with the interpretation is so meaningful and special.  It really has made me appreciate our diverse lives.

The other major aspect of the recipe swap group that has changed my life is that it has forced me to step outside of my boundaries to try new things.  The rabbit recipe really helped my stretch out of my norm.  I would have probably never gone to a butcher and asked for '1 chopped rabbit please' if it hadn't been for the recipe swap group.  I was so nervous...but ended up feeling so unexpectedly empowered afterwards.  So I thank you, Christianna.  From the bottom of my heart, I thank you and our whole group for the support, encouragement and creative spirit you have all added to my life.  Cheers to our Recipe Swap group...to many many more years of sharing.  Check out the links below for everyone else's interpretation of the Maple Cake:


Chocolate Maple Zucchini Cake
Yields 9-12 servings (depending on how you cut the cake)
Adapted from R's recipe


This is one of those secretly healthy cakes with the addition of zucchini, apples and whole wheat pastry flour.  I have a plethora of apples in my fruit basket, so thought it would be a nice addition to the cake.  But if you prefer to just use only zucchini, swap out the apple and replace it with 1/2 cup of more zucchini.  The original recipe calls for 1 1/2 cups sugar, which I replaced with only 1/2 cup maple syrup.  This cake is definitely on the less sweet side, so add more maple syrup if you are so inclined.  You can also experiment with different flours.  Oat flour would have added a nice dimension.  So go wild with your flours...it is a celebration after all.

1 cup all purpose flour
1 1/4 cup whole wheat pastry flour
1/4 cup cocoa powder
1 tsp baking soda
1 tsp salt
1/2 cup salted butter, room temperature
1/4 cup safflower (or canola) oil
1/2 cup maple syrup
2 eggs
1 tsp vanilla
1/2 cup plain yogurt
1 1/2 cup shredded zucchini
1/2 cup shredded apple
1/2 cup chocolate chips

Preheat oven to 325 degrees.

Sift the flours, cocoa, baking soda and salt in a large bowl.  In a separate large bowl, cream the butter, oil and maple syrup until fluffy and well combined.  The butter will be a little chunky at this point, probably because it is maple syrup and not sugar.  This is fine, it will still cook the same.  One by one add in the eggs and whisk.  Drizzle in the vanilla and whisk until combined.

Pour about 1/3rd of the dry mixture and a few spoonfuls of the yogurt into the liquid mixture.  Stir well.  Continue with this method until all the dry ingredients and yogurt are all used.  Add in the zucchini and apple.  Mix until everything is fully integrated.

Pour the batter into a parchment lined (or greased) 9 x 9 pan.  Bake for 25 minutes.  Carefully pull out the pan, and sprinkle with chocolate chips.  Place on top of a baking sheet in case a random chip jumps off.  Place back in the oven for 25 more minutes or until fully cooked.  Remove from oven and let cool.  Slice a nice square piece and enjoy with a cup of coffee or glass of wine.


11.04.2011

Sauteed Cashew Kale


I have recently discovered adding nutritional yeast to sauteed vegetables.  It was a sort of an accidental finding.  One night I was cooking spinach with soy sauce and I wanted to add a different dimension.  Nothing was really connecting until I opened my pantry to find a little bag of nutritional yeast.  That may be interesting, I said...so I sprinkled a little.  Then a little more.  It immediately transformed into a rich cheesy dish.  It's one of those secret ingredients that converts a dish into a meal. 

I have made dozens of versions of this meal.  It has now reached status of 'Usual Suspect'.  If I have any sort of green such as kale or beet greens, then I have a meal because my cabinets and freezer are always stocked with nutritional yeast, soy sauce and some sort of nut...in the most recent case, cashews and pecans.  And it is chock full of nutrients like B vitamins, fiber and a fair amount of protein, for not a lot of calories.  Sometimes I toss a fried egg on top, and then it really is a full meal.  You can find it in the bulk section at the grocery or Bob's Red Mill makes it too and is usually in the baking aisle.

Tonight I had a lot of errands to run right after work...lots of returns, grocery shopping, picking up free things from coupons and buying a few unplanned items, like jeans.  I have a rule of thumb to never specifically go out shopping for jeans.  But when I happen upon a pair, I always try them on.  Jeans are one of those items that seem to magically appear when you least expect it.  So when the opportunity arises...embrace it.  And tonight was one of those nights.  Same rules apply with nutrional yeast...if it is there, give it a whirl.


Sauteed Cashew Kale
Yields 1-2 servings

You may be thinking that adding a yeast product to vegetables is quite strange.  And I do agree that it does sound scary.  But variety is the spice of life.  I do have to admit, it does take a few times to develop a taste for it...but once you do, you will begin to crave it in the middle of a meeting on a random Thursday.  You will find reasons to add it to food, such as popcorn.  But for those of you still a little apprehensive, this recipe is still good without it.  Baby steps.
1/2 Tbsp olive oil
1/4 onion, thinly minced
3 mushrooms, thinly sliced
Salt and pepper
6 cups kale, roughly chopped
Splash of water
2 Tbsp nutritional yeast (optional, but just do it)
1 Tbsp low sodium soy sauce
2 Tbsp cashews

Heat a medium saute pan on medium heat.  Pour in the olive oil and let it heat for a few minutes.  Sprinkle in the onions.  Saute until lightly browned, about 5 minutes.  Toss in the mushrooms and a dusting of salt and pepper.  Saute until the mushrooms are almost fully cooked and browned, 3-5 minutes.  

Drop the kale into the pan.  Pour a splash of water (about 1 ounce).  Cover.  This will really quicken the cooking process.  You know the kale is almost done when it turns a darker shade of green...it only takes about 1 minute.  Remove cover and stir in the nutritional yeast and soy sauce.  Tongs work well to help integrate the nutritional yeast and soy sauce.  Cover and cook for 1 minute.  The nutritional yeast will start to melt immediately.  Turn off heat and let sit for 1-2 minutes.

Uncover and mix in the cashews.  Serve immediately as a main course or alongside an egg or baked chicken.  A nice glass of Syrah complements the rich salty hints.

10.31.2011

Caramelized Shallots and Aspargus


A few mornings ago my fridge was completely empty of vegetables...which was good because I was leaving on a long weekend trip home to Ohio.  My flight was in the afternoon, which was such a luxury.  I usually take early flights when heading east.  So I was able to make myself a nice meal before heading to the airport...with leftovers to take on the plane.  Ever since I read 'Cooking For Mr. Latte' by Amanda Hesser, my view on plane food has changed.  She takes a gourmet meal with her every time she flies.  So I thought, why not do the same? 

I took a power walk down the street to run some errands, and popped into the grocery for asparagus and a bottle of ginger Kombucha tea.  All the other ingredients were waiting for me at home.  It was one of those days that I felt like I had all the hours in the world to get ready, and then once I got home from the grocery, I was a frantic tornado in my apartment...flipping an egg, caramelizing shallots, packing the last minute charging cords into my suitcase, checking my flight status (which was delayed), and watering my plants.  I whipped up the asparagus, ate, packaged the rest in a plastic container for the plane and ran. 


Caramelized Shallots and Asparagus
Yields 2 servings

This is a super simple way to fancy up your vegetables, whether you have fifteen minutes or two hours.  If you have a shallot or onion laying around needing attention, pull out the brown sugar and get caramelizing.


1/2 Tbsp olive oil
1 shallot, very thinly sliced
Salt and pepper
1 level Tbsp brown sugar
1 tsp balsamic vinegar
1 bunch asparagus, chopped into small eraser-sized pieces
Additional splash of olive oil

Heat a medium saute pan on medium heat.  Pour in the olive oil and allow to heat up.  Drop in the shallots.  Cook for a good 10 minutes until they become nice and relaxed, fully cooked and browned.  Sprinkle with salt and pepper and saute for another minute.  Add in the brown sugar and stir to coat each piece and allow the sugar to melt.  Splash in the balsamic and stir quickly (it may get really steamy for a few seconds depending on the heat of the pan).  Scoop the shallots out of pan and onto a separate plate. 

Plop the asparagus into the same pan and stir in a little extra olive oil to release any of the leftover sugars in the bottom.  Cook the asparagus for 3-5 minutes, adding in salt and pepper to taste.  Turn off heat and stir in the caramelized shallots.  Serve as a side to an omelet and toast or at dinner with baked chicken and wild rice.


10.24.2011

Butternut Squash and Kale Risotto


Risotto is a comfort food that creeps into my mind on cold windy days.  It is a sort of an adult version of macaroni and cheese but with all the veggies, a splash of wine and a toasted seed accent.  It always reminds me of my trip to Europe about three years ago.  I hopped around to seventeen cities, within five countries using trains, buses, and mostly my feet...all in the matter of five weeks.  Needless to say, I had to nourish myself with samplings of every type of cuisine.  

My favorite two weeks were in Italy.  I had grand plans to make it all the way down to Sicily.  But after my first stop in Venice for two nights, I quickly realized that if I wanted to fully experience a city, I would have to stay at least two nights per city.  And I already mapped out Florence, Rome, Sienna, Milan and Cinque Terre.  The days and nights were adding up.  So Rome would be the most southern city for that particular trip.  Always a good reason to come back to do Southern Italy another time.


I really outdid myself by the end of the Rome trip.  By foot, I covered all the major (and minor) landmarks, ate pasta, pizza, fresh mozzarella, chocolate croissants, many shots of espresso and glasses of wine.  I walked at least ten miles a day.  After going to Pisa and Cinque Terra, I stumbled into Milan for my last Italian stop.  I had just been on the beach in Cinque Terre, to sadly be greeted with rainy Seattle weather while in Milan.  So the only thing left to do was eat and shop.  I got quite an bagful of great shoes and clothes.  But my most memorable part of Milan was artichoke heart risotto. 

I wasn't staying in the nicest area of town, so I went for a fairly early dinner of risotto and red wine.  Upon arrival of my steamy plate, my eyes widen...my posture straightened.  I think the lights may have even dimmed and turned a shade of red.  I vowed to savor every single bite of this perfect dish.  I could smell the wine wafting from the plump pieces of rice.


So when I got the invitation from Judith to attend a pressure cooking class at Allrecipes I jumped on the chance...hoping risotto would be on the menu.  And sure enough it was.  In addition to apple bread pudding, carrot orange ginger soup, and farfalle with sausage and peppers.  It was quite amazing to see how much time is saved by cooking with a pressure cooker.  After the squash and onions were cooked and the pressure was applied to to the pan, the risotto only needed about seven minutes to work it's magic.  So I thought, 'Why don't I try a similar recipe at home, and see how much longer it will take in an old regular pan.'  The difference was about twenty minutes.  Quite a savings in time.  I am convinced now of the time saving abilities in addition to the versatility of a pressure cooker.  I mean...apple bread pudding in about twenty minutes?  Not bad at all. 

It was such a lovely night to sit in the beautiful Allrecipes kitchen watching Rachel Fredricks, a chef from Portland take us on a journey with Fissler pressure cookers with a backdrop of the bustling downtown Seattle.  We got samplings of all the vittles mentioned above.  So pressure cooker or not, do yourself and your loved ones a favor and make risotto on the next cold evening.  I featured it at an ATM gathering last week along with M's All Recipes Braised Balsamic Chicken and T's roasted cauliflower and Brussels sprouts...and of course a clink of sparkling wine.  Life is good.


Butternut Squash and Kale Risotto
6-8 servings
Inspired by Rachel Fredricks' cooking demo at Allrecipes kitchen

Risotto is one of those dishes just asking for variety.  It is a chance for you to use extra vegetables in the fridge or freezer...such as frozen artichoke hearts, mushrooms or peas.  Butternut squash and kale are really bright and flavorful so try those out too.  Any sort of broth will do as well.

1 Tbsp olive oil
3-4 cups butternut squash, peeled and cut into small 1/2-1'' cubes (fresh or frozen)
(Save the seeds to roast and top the risotto.  Directions below)
1/2 yellow onion, diced
1 1/2 cups arborio rice, dry
Salt and pepper to taste
4 cups chicken broth (or vegetable broth)  + 2-3 cups water (as needed)
1/2 cup white wine (such as Sauvignon Blanc)
2 Tbsp butter
1 1/2 cup Parmesan cheese
1 cup fresh kale, minced into tiny pieces

Butternut squash seeds
Olive oil
Salt and pepper

Pull out a medium to large saute pan because this is a pretty bulky dish.  Turn the heat onto medium and warm up the olive oil.  Pour in the squash and the onions.  Saute until the onions get slightly translucent and the squash has softened a little bit.  There is more cooking to do, so they don't need to be fully cooked yet.

At this point, preheat your oven to 425 degrees if you are going to roast the seeds.  Clean the seeds in a strainer to get rid of any extra stringy squash insides.  Dry by squeezing them in a towel.  Transfer to a small bowl and toss with olive oil, salt and pepper.  Pour the seeds onto a parchment or Silpat lined baking sheet.  Roast for about 10 minutes.  Check on them often to be sure they aren't burnt.  You may need to keep in a little longer if they aren't quite crisp after 10 minutes.  Remove from oven and set aside.

Meanwhile, add the rice to the squash and onions.  Stir for a few minutes so the rice gets a little toasted.  Sprinkle in a little salt and pepper.  This is when your workout starts.  Pour in about a cup of the broth and continuously stir until all the liquid gets absorbed.  Repeat the with rest of the broth, doing a cup at a time.  Slowly but surely, the rice will begin to fluff up.  Add in the wine next.  I add this toward the end so you still get a hint of the wine flavor by the time you eat it.  At this point, use additional water if it isn't cooked fully by the time you use up the broth and wine.  This stirring process should take about 20 minutes...give or take 5 minutes. 

Once the rice is cooked, stir in the butter so that every piece of rice gets a little coating.  Sprinkle in the cheese and fully integrate it until all is melted.  Add in the kale.  You will have a nicely green flecked risotto.  Adjust any salt and pepper needs.

Plate immediately.  Drop a few roasted squash seeds on top of each serving.  Serve alongside chicken and roasted vegetables like we did or whatever suits your fancy.


10.19.2011

Mint-Cilantro Chutney


These two mysterious sauces at Indian restaurants used to always intrigue me.  Before I was of the mind to simply ask what they were, I just dipped away unknowingly.  I knew the green sauce was made of cilantro and was the spicier of the two.  Although I preferred the sweet dark sauce thinking it was of a plum nature. 

Until...several years ago my mom loaned me The Hindi Bindi Club by Monica Pradhan.  This is a story of mothers and daughters, relationships, and tradition...with recipes and food flavoring the way.  Each chapter ends with a recipe that has been discussed in some form.   Upon finishing the book, I photocopied every recipe and have been using them as reference for the past five years.  She successfully demystifies Indian cooking and simultaneously warms the heart and the kitchen.  Years later I still think about the book especially when I am on a long flight home or am cooking a big Indian meal.   

My little apartment has experienced cashew butter chicken, chapatis, homemade naan and paneer, curried cauliflower, aloo gobi...just to list a few.  My favorite part of cooking Indian food is the warmth and spice it adds to the room and to our spirit.  There is something quite magical about the way a room transforms with the perfume of cinnamon, the dip of naan and the light of a candle.  This post is also in celebration of upcoming Diwali aka 'festival of lights'.  I am not of Hindu background, but from what I hear and read, it is a celebration among family and friends on the triumph of good over evil.  What a great way to start the fall season but with family, friends, food and celebration. 


So pull out your pots and pans and start celebrating.  Or in the case of this recipe, gather up the mint and cilantro, squeeze the lime and start blending...and dip away with full knowledge of what the chutney entails. If you are wondering what the dark sweet chutney is... it is tamarind!  Remind me to feature that on another occasion.


Mint-Cilantro Chutney
From 'The Hindi Bindi Club' book
Yields 1 cup

1 cup fresh cilantro, roughly chopped
1/2 cup fresh mint, roughly chopped
1/4 cup yellow onion, chopped finely
1 clove garlic, chopped
1/2 tsp fresh ginger, peeled and grated (or chopped)
1/2 jalapeno pepper, minced (use more or less as you like)
3/4 tsp sugar
1/4 tsp salt
2 Tbsp lime juice (freshly squeezed)
2 Tbsp water

Measure all ingredients into your food processor or blender.  Blend until smooth (like the texture of pesto) and pour into a small serving bowl.  Letting the flavors marry for at least 15 minutes is ideal before serving.  But if time is ticking, it will still be a refreshing start of the meal for your guests.  Dip papadams and naan or pour a little over your rice.

10.15.2011

Pineapple Coconut Compote


This morning is one of the most heavenly mornings.  I was actually dreaming last night about how great my morning was going to be today.  As of recent, I have stepped onto a social roller coaster that just hasn't stopped moving.  It has been the most glorious ride with beautiful scenery and dozens and dozens of people, food and experiences.  I equate it much to the boat ride they take in Willy Wonka...but without the worms crawling over the people's faces.  Those of you that need a refresher, click on the highlighted Willy Wonka above, and you will go directly to the scene.  There have been a few days in the past weeks where I felt like the image they show of Willy Wonka sitting there looking back and forth slowly with his eyes...taking in the scenario...with his wild hair only partially contained under his top hat.  Take out the terror and confusion in the video, and add in laughter, wine glasses clinking and sunny rolling hills and you've got a glimpse of my most recent adventures.

It all started with my solo road trip down to San Francisco.  It was a fairly last minute decision on my part, but I got an offer to house sit in the Mission and I just couldn't turn down such a fun offer.  So I literally packed up my car in a matter of a Sunday evening and headed South.  Along the way, I visited with a friend in Portland, went to Bob's Red Mill Headquarters, stayed at a lovely B&B in Ashland, reported my fresh produce to the California border patrol, and sang my way through the hills of northern California to the Mission.


During vacation I always intend to have relaxing days, but I get so excited to explore and 'Carpe Diem' as B and M say.  So my mental calendar of events builds with every sip of coffee in the morning.  I think 'well if I am in that area of town, I can see this and that while I am there'...and all of the sudden I have a personal brochure of events in my head.

A few of the activities I covered: familiarizing myself with the Italian deli in the Mission, driving out to the coast to Santa Cruz and Half Moon Bay followed by a lovely Indian dinner with M in warm Palo Alto.  I also got a thorough visit with the Berkeley area, had lunch at Chez Panisse, had coffee with a fellow blogger, discount clothes shopped with a friend and had dinner with another friend in downtown SF.  I explored the raw vegan community's local watering hole and restaurant (twice)...starting dinner off with a shot of wheat grass and a bowl of raw butternut squash and apple soup.  Amazingly good.  So fresh and clean.  I walked home feeling vibrant and full of nutrients and ideas for the next day.

I could go on and on about the SF trip...but I will save those anecdotes for another rainy day...that was just a few days worth of detail.  But one point I must mention is how much I have learned in the past three weeks.  That the more you open yourself to new experiences, the more colorful your life's canvas gets painted.  And you find yourself in situations you would have never imagined.  Life is so wonderful in that way.  And as they say, 'The universe is generous to those who follow their heart.'

Now that brings us full circle to the pineapple compote.  This morning was the first morning in three weeks with not a mark on my social calendar.  This was by design....and much much needed.  I woke up, whipped up some French toast, tossed together the pineapple compote and sipped coffee.  I have been devouring Woody Allen movies recently...so I popped in 'Melinda and Melinda' while taking pictures of pineapple.  I am taking myself on a date to the movies later and might sneak in my own bag of homemade truffle popcorn and a little jar of 'juice'...Ahh life is good.  Stay tuned for more.


Pineapple Coconut Compote
Yields about 1/2 cup

You will see below that I used two different kinds of coconut...unsweetened and sweetened.  I did this simply because I had both on hand and prefer my dishes on the less sweet side.  But by all means, use 100% sweetened coconut if you prefer.  You can also experiment with different types of juice.  Compote is rich with opportunity to use different fruits and juices that you already have in the refrigerator.

1 cup frozen pineapple chunks
2 Tbsp unsweetened shredded coconut
1 Tbsp sweetened coconut
1 tsp vanilla extract
6 Tbsp orange juice

Measure all of the above ingredients into a small saute pan.  Turn heat onto medium.  Slowly stir all ingredients together and bring to a simmer.  Allow to simmer for about 10 minutes until the liquid has reduced down to more of a syrup.  Here you can you use your personal preference.  You can either turn off the heat and spoon the compote onto your French toast immediately.  Or you can pour it into a food processor to have a more pureed version, such as myself.  Even with pureeing, you will still get the pleasure of chewing it a bit because of the coconut.  Whichever way you go, you can serve it atop a piece of bread or French toast sprinkled with a little more coconut.  Or you can refrigerate and eat it more as a jam.