Pages

An Open Cookbook

An Open Cookbook

4.28.2011

Shredded Apple Carrot Salad


Although it has been a really chilly April in Seattle, I still have thoughts of spring and warm weather.  The other day I put a winter coat away just because it is time for spring.  I have filled my apartment with flower pillows and colorful artwork.  If it's not warm outside, dang it, it will be inside.  Along with these channeled warm thoughts have been all kinds of bright salad ideas. 

Recently Sunday has been cooking and food preparation day.  It is so satisfying to get up Monday morning with a fridge full of possibilities for the week.  So this week, shredded apple and carrot salad was one such container.  Super simple and super easy to eat.  It leaves you feeling vibrant and healthy afterwards...like sitting on a warm beach with a hibiscus flower tucked your hair.


There are so many ways to prepare this recipe.  You can add raisins or pinenuts for a little something extra.  Or purple cabbage for color.  Shredded jicama would add a nice crunch.  You can use two lemons and skip the vinegar for a more citrus flavor.  Any way you make it will produce a satisfying salad.  Enjoy!

Shredded Apple Carrot Salad
Adapted from Rose Bakery's 'Breakfast Lunch Dinner' Cookbook
Yields about 3 cups

2 cups baby carrots (about half of 1 lb. bag), shredded/grated
1 Granny Smith apple, shredded/grated
2 Tbsp sesame seeds, pan toasted
1/2 cup fresh parsley, chopped

Juice of 1 lemon (about 1/4 cup)
2 Tbsp apple cider vinegar
1 tsp salt
1/2 tsp pepper
1 Tbsp sugar
1 garlic clove, minced
2 Tbsp safflower or canola oil

Heat a medium saute pan over medium heat.  Add sesame seeds.  Continually toss over heat until seeds brown and become fragrant.  Turn off heat and give them a rest.

Shred the carrots and apple with the grating blade on a food processor or use box grater or mandoline.   Place the carrots and apple in a medium sized bowl.  Add the sesame seeds and parsley.  Toss evenly.

Prepare the dressing by whisking together the lemon juice, vinegar, salt, pepper, sugar and garlic.  Slowly drizzle in the oil and whisk until fully blended.  Adjust seasoning if necessary.

Pour the dressing over the carrot apple mixture.  Mix until all ingredients are fully coated.  Eat as an appetizer salad, as filling for a wrap or with pita chips.


4.23.2011

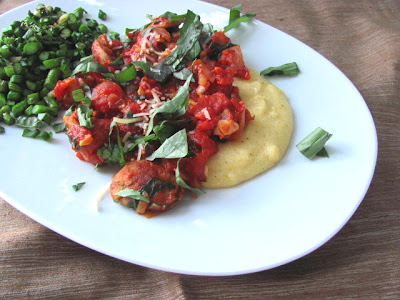
Peppery Parmesan Polenta with Spicy Sausage Sauce


I'd like to begin by thanking Cooking Light...this recipe made my Friday night.  And how fun is it to say the title: Peppery Parmesan Polenta with Spicy Sausage Sauce.  ( I added the 'Peppery' part just to make it even.)  I was outside taking a picture of the plate of food, sneaking a quick bite, and literally raised my eyes and spoke out loud saying "Ohhh my.  This is delicious!".  It was just me and the front porch out there at the time, but I needed to announce it to someone or in this case, something: the unassuming front porch window. 

After all this house de-cluttering, I actually have time to take a few minutes each night to sit down and look at current magazines.  This was sort of unheard of in my past life.  I usually let them pile up for months (or sometimes years) and then get overwhelmed, and don't take true time to look through them.  But this month I did...and it is super.


Polenta is one of those recipes that I always forget about, which is unfortunate because it is so quick to make and so versatile.  I assisted a cooking class a few months ago, and she made sweet polenta with milk and dried cranberries and orange zest.  At The Dinette, a cute little Euro-bistro in town, they make it more like grits drizzled with olive oil, where you spoon it onto your plate.  You can also add fresh herbs and different cheeses and put it into a pan and bake it, and serve in slices.  This recipe is more in the middle, and well worth every minute of the preparation.  And the good news is that it doesn't take very long to make.


I have a few notes about this recipe.  You can absolutely make it vegetarian by using veggie sausage, or tofu, or just eliminate the sausage altogether and add vegetables or beans.  Use vegetable broth instead of chicken, and you have a veg meal.  I cut the original recipe in half and only changed a few components.  It originally called for fresh oregano, but I didn't want to buy a whole container, so I used dried.  So if you use fresh, use about 1 1/2 tsp.  Keep the basil fresh versus dried if you can.  It really transforms the sauce right at the end.  Polenta is essentially just cornmeal.  So if you have cornmeal on hand, (like I do), you can simply use that.  Or if you want to follow the original recipe, use quick-cooking polenta.  I added sauteed asparagus on the side for extra vegetables and color.  But any vegetable or side will do. 


Peppery Parmesan Polenta with Spicy Sausage Sauce
From Cooking Light May 2011
Yields 2 servings

1 Tbsp olive oil
1 chicken sausage link (any flavor), sliced in diagonal coin shapes
1/2 cup onion, chopped
2 cloves garlic, minced
3/4 tsp oregano, dried
1/4 tsp crushed red pepper
1 (14.5 oz) can of no salt added diced tomatoes, undrained
1/4 cup fresh basil, chopped and divided in half
1 cup low sodium chicken broth
1/2 cup water
6 Tbsp corn meal (or quick-cooking polenta)
1/4 cup Parmesan cheese + more for topping
Pepper to taste

Heat a medium sized saute pan over medium/ high heat.  Add olive oil and swirl to coat.  Add sausage and cook until browned on both sides.  Turn heat down to medium, and add onion.  Saute until onion is lightly browned, about 3-5 minutes.  Add garlic and saute for 30 seconds.

Add oregano, crushed red pepper and tomatoes.  Bring to a boil.  Reduce heat to a simmer and cook for 15 minutes, partially covered, stirring occasionally.  Add half of the basil to pan and cook for 5 minutes or until the sauce thickens.

Meanwhile, combine the broth and water in a medium saucepan and bring to a boil.  Add cornmeal (polenta), reduce heat to low and continually stir with a whisk for 5 minutes, until it becomes smooth and creamy.  Stir in the 1/4 cup of cheese and a sprinkling of pepper.

Pour the polenta onto each plate or bowl.  Top with the sauce, remaining basil and extra parmesan.  Savor every spicy bite.


4.19.2011

Tangy Garbanzo Bean Olive Spread


My inspiration for new recipes is often sparked  from running in circles.  One of my midday treats is working out on the elliptical during lunch while watching the Food Network.  A few weeks ago, while I was sweating over Italian cooking, Giadi gave the idea of introducing hummus to tapenade.  This was the most brilliant combination I had heard since sweet potato biscuits.

As the olive enthusiast I have become, they have made permanent residence in my refrigerator.  Many of this recipe's ingredients have.  So last night I ran into the grocery for some lemons, and I was ready to set up camp at the food processor.

I pretty much kept to what she recommended for ingredients.  Except that I changed the black olives to green.  The black definitely make it a deep rich color, but I am still tip toeing around black olives.  Green are my staple.  But by all means, try it with black, such as kalamata.  I doubled the parsley, just because I love it and have a huge bunch on hand.  Thirdly, she calls for fresh rosemary.  I would never use a whole package of fresh, so I just cut the amount to a third of what she suggested and used dried. 

But what a tangy treat this is...and so versatile.  It can be used on a sandwich, as a dip, in an omelet, or simply eaten straight from the spoon.  I had it on apple slices with provolone today.  Perfectly satisfying post-workout treat.


Tangy Garbanzo Bean Olive Spread
From Giada De Laurentiis- Giada at Home
Yields about 2 cups

1 (15-ounce) can garbanzo beans, drained and rinsed
1 cup olives, pitted (green or black)
1/4 cup extra virgin olive oil
1/2 cup flat leaf parsley leaves, fresh and plucked from stem
1 tsp lemon zest
2 Tbsp lemon juice, from fresh lemon 
1 Tbsp honey
1/4 tsp rosemary, dried
1/4 tsp salt

Combine all ingredients in food processor or blender until smooth.  Can be used as a dip for crackers and vegetables, spread on baguette with cheese or in an omelet with feta.


4.14.2011

Drink Your Greens


A few months ago I bought a Whole Living magazine with all kinds of smoothies on the front cover.  It was so inspiring and such a good reminder how easy they are to make.  Also how they are a vehicle to add all kinds of ingredients.  We did a study one time at work where we had to include oil in all types of recipes throughout a day's worth of food and smoothies were one of the recipes that was really easy to put it in.  They are also good to put fruit that is just a little too ripe for taking a toothsome bite into, like an overly soft peach or freckled banana.

With all this cleaning and apartment feng shui-ing lately, I have been craving fresh food that makes me feel vibrant and alive.  All types of greens and vegetables have been making their way into my fridge.  Parsley is one herb that I almost always have on hand and makes for a refreshing component of a meal or recipe.


My colleague B told me that her husband makes a whole batch of smoothie, and then they drink it throughout the week.  My eyebrows immediately raised when she told me this.  What a great idea.  So with that in mind, I embarked on a journey to green smoothie land last night. 

I saw a recipe on the Whole Foods recipe index that included spinach.  So now there were two greens to make an appearance.  Banana was a must because it mixes so well.  Frozen mango and plain yogurt were already at my house so that was easy.  It needed one final zing...nothing like a little kick from fresh ginger and lemon juice.  All the ingredients were in place for a vibrant drink.


This recipe is definitely open-ended.  Personally, I like to drink my smoothies with a spoon, so I prefer them on the thicker side.  I also like them on the less sweet side.  So work with it and add ingredients such as:
  • Orange juice or mango juice for a thinner smoothie
  • Honey for a sweeter smoothie
  • More spinach or parsley for a greener smoothie
  • Milk (dairy or non-dairy) for a more protein-filled smoothie
  • Flaxseeds for a more fibrous smoothie
  • More ginger for a spicier smoothie
The options are endless!

Sweet and Spicy Green Smoothie
Inspired by a Whole Living and Whole Foods recipe
Yields about 4 (1/2 cup) servings

1 banana
1 1/2 cup frozen mango
1 cup spinach, packed tightly in measuring cup
1/3 cup fresh parsley, lightly packed in measuring cup
1 1/4 tsp ginger, fresh and grated
1/2 cup plain nonfat yogurt
1 lemon juiced

Puree all ingredients in food processor or blender.  Adjust for your flavor preference.  Make a double batch for your family or for yourself all week.

4.11.2011

Divine Dosas with Massaged Kale


What you just witnessed in the two pictures above, is the transformation of four little packets into a home cooked Indian feast of fragrantly spiced potatoes wrapped in homemade dosas.  I met Veena, the owner of Veena's Market (http://www.veenasmarket.com/) at a networking event a few months ago.  What her company does is demystify the art of Indian cooking, by making recipe kits equipped with all the spices and flours you need to make authentic Indian food at home. 

Veena has thought of everything...on one handy card, she gives you all the information you need.  She provides a shopping list for all the fresh ingredients like onion, potatoes, and cilantro.  For this recipe, she suggested different sides and drinks to complement the dish.  I thought her idea of chutney sounded good, so I made a spicy mango and apple chutney.   Inside the same card, she gives a thorough description of all the preparation and cooking instructions.  This personal touch makes you feel like she is standing right next to you handing you the ingredients.  As a nutritionist and being a curious person, I wanted to know what was in each packet...and low and behold, she lists that information too.  


Cooking the spiced potatoes and dosas created a warm environment in my little apartment.  By the time M knocked on my window, the chutney was bubbling and the kale was resting after the salt massage.  We snacked on olives and almonds while everything else materialized on the stove.  It was so exciting to snip open each of the little plastic envelopes, take in the aroma, and quickly look at the reference section on the card to see what everything was.

The most interesting aspect was the lightly spiced rice and black lentil flour mix for the dosas.  All you do is add water to the mix, and you are on your way to making these crepe-like pancakes.  The batter is so fluffy that it is like biting into a savory cloud.  


With every herb and spice I added to the pan, a new layer of richness was added to the room.  It was as if they perfumed the conversation with happiness.  We added massaged kale to the potatoes for a little extra burst of color.  As we bit into the dosas, we couldn't keep from saying 'This is SO good'.  Every single bite brightened our eyes a little bit more.  Thanks to Veena, M and I had a most pleasant Friday night, and I enjoyed leftovers a few more times over the weekend. If you have always wanted to know more about Indian cooking, and have felt intimidated by it, check out her website and place an order for a little bit of India to arrive at your doorstep.

Massaged Kale

Dinosaur kale
Salt, sprinkling to coat
Red pepper flakes

This is a really simple technique I learned from my friend S.  Wash and pat dry the kale leaves.  Cut into thin ribbons, and add enough salt to thinly coat the kale and toss in red pepper flakes.   Lightly massage the salt and pepper flakes into the kale for a few minutes.  Set aside and let rest for at least 10-15 minutes while you prep other components of the meal.  While it is resting, the kale slightly breaks down to create the texture of cooked kale.  It is the simplest way to 'cook' your kale without turning on a burner.  Use for salad, as a side dish, or as a component for Divine Dosas.


4.08.2011

Iron Horse Smokey Chickpea Barley Burger


Over the holiday season I was in Cincinnati visiting my family and we went to one of my parents favorite restaurants The Iron Horse (http://www.ironhorseinn.com/).  Whether we are in Seattle or Cincinnati, we are on a continual search for the best veggie burger.  So recently, they raved about a great place with chickpea-beet burgers and sweet potato fries.  So they wanted to give me a first hand experience.  I was sold at first glance.  These veggie burgers have made a home in my mind for the last three months. 

One of the best parts about the whole experience was the opportunity to meet the executive chef, Jackson Rouse.  He came out to say hello and tell us all the ingredients in the veggie burger.  It was such a welcoming feeling to have him sit at our table, and go over each of the main ingredients in the burger.  Veggie burgers are such an art form, and to create a successful one that binds well, has a good flavor and is authentic is something to brag about.  Jackson has created just that.  This chickpea burger is the perfect size, bigger than a slider, but small enough that the crunchy sweet potato fries are a perfect complement.  The burger also comes with avocado,  sliced peppers and green goddess dressing.  I had to consciously tell myself to eat slowly and savor every bite to make the experience last as long as possible.


I was so honored when he gave me a copy of the recipe.  So last night I put it to good use.  As usual, I couldn't follow it completely.  The original recipe calls for pecans.  Because I have a gigantic bag of almonds in my freezer I used those.  The original recipe calls for barley and oats.  And I had both, but not enough oats, so I supplemented with quinoa.  I bought some smoked chili powder several months ago, so I used that instead of the smoked paprika.  For good measure I put some extra beets in too, so they are a little redder than the restaurant version. 


This is truly a whole foods recipe.  All the ingredients are so fresh and pure, that they deserved their own photo shoot.  Pictured above are the pan toasted almonds and garlic.  Right above are all the grains: barley, oats and quinoa, with a hint of the beets and smoked chili powder in the corner.


I must say, it is quite helpful to have all the ingredients pre-measured and ready to drop into the pan when their turn arrives.  So if you have the time, I highly recommend it.

While the onions and grains were cooking, I put the rest of the ingredients in the food processor in preparation for pulsing.


There are so many dimensions and colors to this recipe.  And cooking them together made for a really rich smelling apartment.  I got a glimmer of it this morning too.   So go ahead and give this recipe a whirl.  Or even better, go to the Iron Horse...order a glass of wine, sit back and crunch into the veggie burger and dip into the the canister of fries.  Oh and if you are more of a carnivore, you have a pick of other goodies too.


Iron Horse Smokey Chickpea Barley Burger
Adapted from Jackson Rouse's recipe at Iron Horse
Yields about 10 burgers

1 cup onion, chopped
1/2 tsp salt, divided in half
1 Tbsp olive oil plus additional for brushing and cooking burgers
1/2 cup oats
1/2 cup barley, dry
2 cup water + more if needed
1 cup canned chickpeas (garbanzo beans), drained and rinsed
2 Tbsp soy sauce
3/4 cup almonds or pecans, raw and toasted (optional)
2 garlic cloves, coarsely chopped
1/2 cup fresh cilantro, chopped
3-4 Tbsp grated raw beet
3/4 tsp smoked paprika or smoked ground chili pepper
1/4 tsp black pepper

about 1/3 cup flour to bind if needed

Heat medium saute pan on medium heat.  Add oil and saute onion and 1/4 tsp salt.  Stir occasionally until golden brown, about 5-7 minutes.  Add barley, oats and water and cook covered until water is absorbed, about 30-35 minutes.  Add a little water occasionally if necessary, until barley is cooked and all the water is absorbed (very important so the batter isn't soupy).  Transfer to a bowl and mix with chickpeas and soy sauce.

Pulse barley mixture, almonds, garlic, cilantro, paprika, beets, rest of salt and pepper in a food processor until finely chopped.  Transfer to medium bowl.  If the mixture doesn't seem thick enough to make patties, add flour here.  Refrigerate for about 5 minutes.

Form 10-12 small burger patties.  Chill on a plate in fridge at least 10 minutes.

Brush entire patty with oil.  Heat saute pan or cast iron skillet, adding oil and cook each patty until golden brown on each side, carefully turning once.  Serve on a bed of shredded kale and beets for a light dinner.  Or on a bun with cheese and your favorite condiment.  Patties freeze well too!

4.04.2011

Chewy Chocolate Covered Coconut Macaroons


I have three people to thank for inspiring these decadent treats.  First of all my mom because she loves coconut and a few years ago she and my dad came to visit and so I looked up a recipe for coconut macaroons.  The second person is Pranee from http://www.ilovethaicooking.wordpress.com/ because I assisted a class of hers and she had leftover sweetened condensed milk and had me take it home.  Thirdly, my friend M, because she just had a birthday and is a coconut fanatic and therefore would be a willing recipient of birthday macaroons.  So this recipe was a synergistic result of three lovely ladies in my life.

For the majority of my life, I was missing out on coconut mania.  It never really struck a note on the heart strings...until last year.  Two nights in a row, I had a dream about coconut macaroons.  I would slowly sit up in the morning with the essence of coconut on my mind.  I remember walking to work with thoughts of macaroons drifting in and out.  I even thought I got a whiff of them.  So finally I made my way to Whole Foods to buy a gigantic chocolate covered macaroon.  And I haven't turned back.  Instant love.

So naturally, I keep a bag stored in my freezer for emergency situations or birthdays.  The original recipe is for straight up macaroons.  But why not add a little extra with some chocolate.  So you can make them with or without the chocolate.  Either way, close your eyes, take a bit, and think of sitting on a warm beach and maybe you will start dreaming about them too.


Before

After

Chewy Chocolate Covered Coconut Macaroons
Makes 20-25 Macaroons
Recipe from Food Network Barefoot Contessa Family Style

14 oz shredded sweetened coconut
14 oz sweetened condensed milk
1 tsp pure vanilla extract
2 large egg whites, room temperature
1/4 tsp salt

1/2 11.5 oz bag bittersweet chocolate chips (good quality ones like Ghirardelli)
1 Tbsp safflower or canola oil

Preheat oven to 325 degrees. 

In a large bowl, combine coconut, sweetened condensed milk and vanilla.  In a separate small bowl, whip the egg whites and salt together with a hand mixer until they make medium to firm peaks.  Carefully fold the egg mixture in with the coconut mixture until fully integrated.

Line a baking sheet with parchment paper.  Drop small (gumball to golf ball sized) mounds onto parchement, using spoons or even better, your hands.  Bake for 25 to 30 minutes or until coconut starts to brown.  Remove from oven and cool. 

If you are coating in chocolate,  put the macaroons in the fridge to solidify for at least 30 minutes.  To prep the chocolate, heat a large pot or deep saute pan filled with water.  Heat water to a low simmer.  Put a small bowl or small pot inside this to make a double boiler.  (Or use a double boiler if you have one.)  Put chocolate chips and oil in the small pot/bowl.  Stir until the chips have melted into a nice thin sauce.  Carefully dip the macaroons into the chocolate, coating as much as you want.  When all of the macaroons are covered, put back in fridge to let the chocolate solidify.  Share with friends and family!